Once your Source has been configured and deployed, you can begin making asset requests to imgix. These requests differ slightly for each imgix Source type and will vary slightly depending on if you're using the Video API or the Rendering API. For the Rendering API, all requests have the same basic structure:
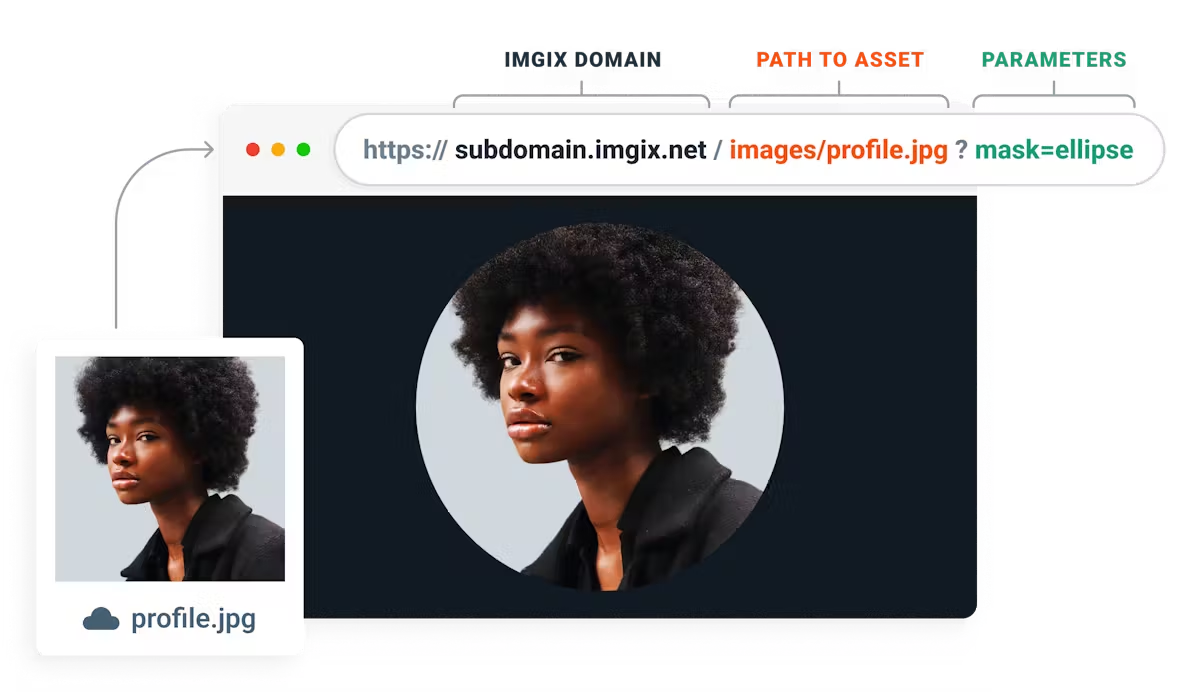
The hostname, or domain, of the imgix URL will have the form YOUR_SOURCE_NAME.imgix.net. In the above URL, hostname takes the form of subdomain.imgix.net if you are using the Rendering API.
When serving assets using the Video API, the imgix domain used would be changed to subdomain.imgix.video. Most (if not all) of the information here can be used to serve videos using the Video API, but we will primarily be referencing serving images using the Rendering API in this article.
The path consists of any additional directory information required to locate your asset within your asset storage (e.g. if you have different subfolders for your images). In this example, /products/desk.jpg completes the full path to the asset. Click below for specifics for each Source type.
imgix's parameters are added to the query string of the URL. In the above example, the query string begins with ?w=600 and the additional parameters are linked with ampersands. These parameters dictate how assets are processed. In the above URL, w=600 specifies the width of the asset and exp=1 adjusts the exposure setting.
Parameters will only affect acceptable input formats, which differ depending on if you are using the Rendering API or the Video API. For non-compatible assets used as an input type, they will be served as passthroughs.
The Video API uses an identical structure, except instead of using the .net top-level domain, it uses .video:
https:// example.imgix.video imgix domain / videos/workplace.mpeg path ? fm=hls query string Amazon S3 Sources
Each object in your S3 bucket has an Amazon hostname and prefix. To process an asset from your S3 bucket, you must replace the Amazon hostname and the S3 prefix with the imgix hostname. All other parts of the URL can remain the same.
Suppose that the Amazon S3 URL is the following, with the S3 bucket name set to example-bucket and the S3 prefix set to example-prefix.
https:// s3-us-west-1.amazonaws.com Amazon Hostname / example-bucket bucket / example-prefix prefix / picture.jpg file name When you set up your Source, you must enter the bucket name, so by default the imgix hostname will replace the Amazon S3 hostname and bucket name. If all of the assets in your Source share the same prefix as well, you can define that in your Source and shorten the URL even further:
https:// example.imgix.net imgix domain / picture.jpg path Google Cloud Storage Sources
Each object in your Google Cloud Storage bucket has a hostname and prefix. To process an image from your bucket, you must replace the hostname and the prefix with the imgix hostname. All other parts of the URL can remain the same.
Suppose that the Google Cloud Storage URL is the following, with the bucket name set to example-bucket and the prefix set to example-prefix.
https:// storage.googleapis.com Hostname / example-bucket bucket / example-prefix prefix / picture.jpg file name When you set up your Source, you must enter the bucket name, so by default the imgix hostname will replace the Google Cloud Storage hostname and bucket name. If all of the assets in your Source share the same prefix as well, you can define that in your Source and shorten the URL even further:
https:// example.imgix.net imgix domain / picture.jpg path Microsoft Azure Storage Sources
Each object in your Azure Container (Blob) or File Share has a hostname and prefix. To process an asset from your Azure Blob or File Share, you must replace the hostname and the prefix with the imgix hostname. All other parts of the URL can remain the same.
Suppose that the Azure Container (Blob) URL is the following, with the account name set to example-account, the container name set to example-blob and the prefix set to example-prefix.
https:// example-account.blob.core.windows.net Hostname / example-blob container name / example-prefix prefix / image.jpg file name Or suppose that the Azure File Share URL is the following, with the account name set to example-account, the file share name set to example-file and the prefix set to example-prefix.
https:// example-account.file.core.windows.net Hostname / example-file file share name / example-prefix prefix / image.jpg file name When you set up your Source, you must enter your Azure Storage account name and the Container name or File Share name, so by default the imgix hostname will replace the Azure Storage account name and the Container or File Share name. If all of the assets in your Source share the same prefix as well, you can define that in your Source and shorten the URL even further:
https:// example.imgix.net imgix domain / image.jpg path Note: By default Azure File Share assets have the Content-Type application/octet-stream, which will cause an asset to be downloaded instead of opened directly in the browser when served via imgix without any parameters. To solve this you can add any imgix parameter (such as auto=compress) to the URL or add a default parameter to your Source.
Web Folder Sources
A Web Folder Source connects your imgix Source to any folder with a publicly-addressable URL where you are hosting your assets. Suppose that the URL of an image is the following:
http:// www.yourcompany.com original domain / images/examples/pic.jpg original path If you set the Base URL of your Source as https://www.yourcompany.com/images/, you can replace this part of the URL with the imgix.net hostname. If the name of your imgix Source is example, the URL that serves the image at the URL above is:
https:// example.imgix.net imgix domain / examples/pic.jpg path Web Proxy Sources
A Web Proxy Source allows your imgix Source to serve any asset with a publicly-addressable URL. In order to serve an asset through a Web Proxy Source, the URL of the original asset first needs to be URI encoded. The encoded URL is added at the end of the Web Proxy hostname. Please note that all Web Proxy URLs need to be signed (see the Securing Images guide for more information about signing URLs).
If the Web Proxy source is called example and the URL of the asset you are attempting to serve is:
http://www.this.com/pic.jpg original URL The resulting URL will look like this (where the value of the s parameter is generated by the Secure Image tool or your code:
https:// example.imgix.net imgix domain / http%3A%2F%2Fwww.this.com%2Fpic.jpg original URL, encoded ? s=V5kYnb7bdDaCfgeB signature Applying Parameters
Once you have the base URL for your assets set up, you can start applying Image or Video URL API parameters to manipulate and serve your images to your specifications. All parameters are normalized within imgix, so their order in the URL doesn't matter. For the Rendering API, see the Order of Operations for more information.
We also designed a handy API Reference Guide one-sheeter, so you can see all the imgix URL parameters at a glance. Save it on your desktop or print it!
Rendering API behavior and examples
We'll demonstrate a good basic set to use, and you can see the full range of what's available in the Rendering API documentation. For these examples, the base URL will be:
http://assets.imgix.net/examples
Basic Parameter Example
For this example, let’s say you have an online magazine that's being read on desktops, phones, tablets, and more. Each article has a header image that spans the full width of the page. Here's what the base image for one such header might look like:

For all examples in this section (and in the documentation), click the image to view it in the Sandbox with the parameters applied. You can experiment with the other parameters there to see their effects.
Resizing and Cropping
On the article page, let's assume your header is constrained to a 900×300pixel container for a wide, short banner. To fit the base image into that container, we'll need to change the dimensions and crop some data from the top and bottom.
w=900&h=300&fit=crop&crop=entropy 
We've applied four parameters to adjust the image:
w=900&h=300: Sets the width and height to fit the container.fit=crop: Tells imgix how to deal with the extraneous data caused by the change in dimensions.crop=entropy: Tells imgix how to determine the origin point of the crop. Theentropyvalue adjusts the origin point based on areas of high contrast (the swimmer) to position him in the center of the cropped image.
Automatic Content Negotiation and Enhancement
So far, so good—the image fits in the header container now. But it's a bit dark, and even though the file size is much smaller than the original, it's still quite heavy at 890kB. Let's add some automatic adjustments to solve both of these issues.
w=900&h=300&fit=crop&crop=entropy&auto=format,enhance&q=60 
By adding two of imgix's auto settings and setting a lower value for q (quality) we've shrunk the file size by almost 99% to 35kB, and brightened the overall tone considerably. Here's how that works:
auto=format: For browsers that support it, converts the image to the AVIF format for better compression. If AVIF is not available, the image will convert to the WebP format next. If neither is available, it will use the original file format or a fallback format if specified.auto=enhance: Applies a set of image adjustments to improve brightness, contrast, and other settings.q=60: Reduces the image quality slightly to improve compression (default is75).
Because format and enhance are both valid values for auto, they can be chained together with a comma.
If you need the same image in another size, all you need to do is change the parameters to fit the new container. For example, if the article is also displayed in a list of articles, you might need this image as a thumbnail instead. By just changing the w and h values, you can easily generate this version as well.
w=200&h=125&fit=crop&crop=entropy&auto=format,enhance&q=60 
Setting Default Parameters for Your Source
If you find that there is a set of parameters that works well across all or most of your image catalog, you can set them as defaults for your Source, so that they're applied to all of your images automatically (you can override them on a per-image basis as needed). If you wanted to set up standard cropping based on the header image above, for example, you would add the fit and crop parameters as defaults in your Source:

- To setup default parameters, visit the Sources page
- Select the
Viewbutton for the Source you want to edit. - Hover over the Gear icon and select the
Editbutton. - Scroll down until you find the Asset Defaults section.
- Under "Asset Defaults", choose a parameter from the dropdown menu and provide the value. Add as many parameters as you'd like to set as your defaults.
- Click the Review and Deploy button once your settings are configured to redeploy the Source with the new Source configurations.
- Review your changes and select the
Deploy this Configbutton when ready.
Note: The ch parameter is not available for use as a default. See our blog post for more information about what you can do with default parameters.
Order of operations
The order in which parameters are applied to an image is normalized within our system. You can list your parameters in any order within a URL and we will re-order them with the following logic when we receive a request using the Rendering API:
- Animated GIF Frame and PDF Page Selection
- Color and Contrast Adjustments
- Trim
- Sizing, Cropping and Rotation Operations
- Blend
- Style Effects
- Palette Extraction
- Text, Watermark, and Border/Padding Compositing
Serving the Original Asset
With the Rendering API
Any parameter applied to an uncached imgix image URL (whether via default parameters or via URL parameters) will cause that image to be processed by imgix's rendering service.
If you wish to serve the original image in its original quality, or if you want to preserve image metadata, you can serve the image without any parameters. Doing this will allow the original asset to be passed through while still leveraging our CDN.
As for non-image assets or assets not supported as an input file-type, those assets will be passed through regardless of whether or not parameters are applied.
With the Video API
Videos served via the Video API will always be processed by imgix if the uploaded video is compatible with our service.
If a video is not compatible, the video URL will return an error, and will display an error flag in the Asset Manager.
Next Steps
Resizing, formatting, and automatic content negotiation and enhancement are just the beginning of what you can do. Using imgix, you can overlay text, stylize images, apply masks, add borders and padding, and much more.
These transformations are all processed by imgix’s state-of-the-art architecture that ensures your media is served quickly and with the highest quality.
Finally, all of this can be integrated easily into existing applications using our robust client libraries. For details about all of the available parameters, read the API documentation, and to see solutions for specific problems and use cases, check out the Tutorials.