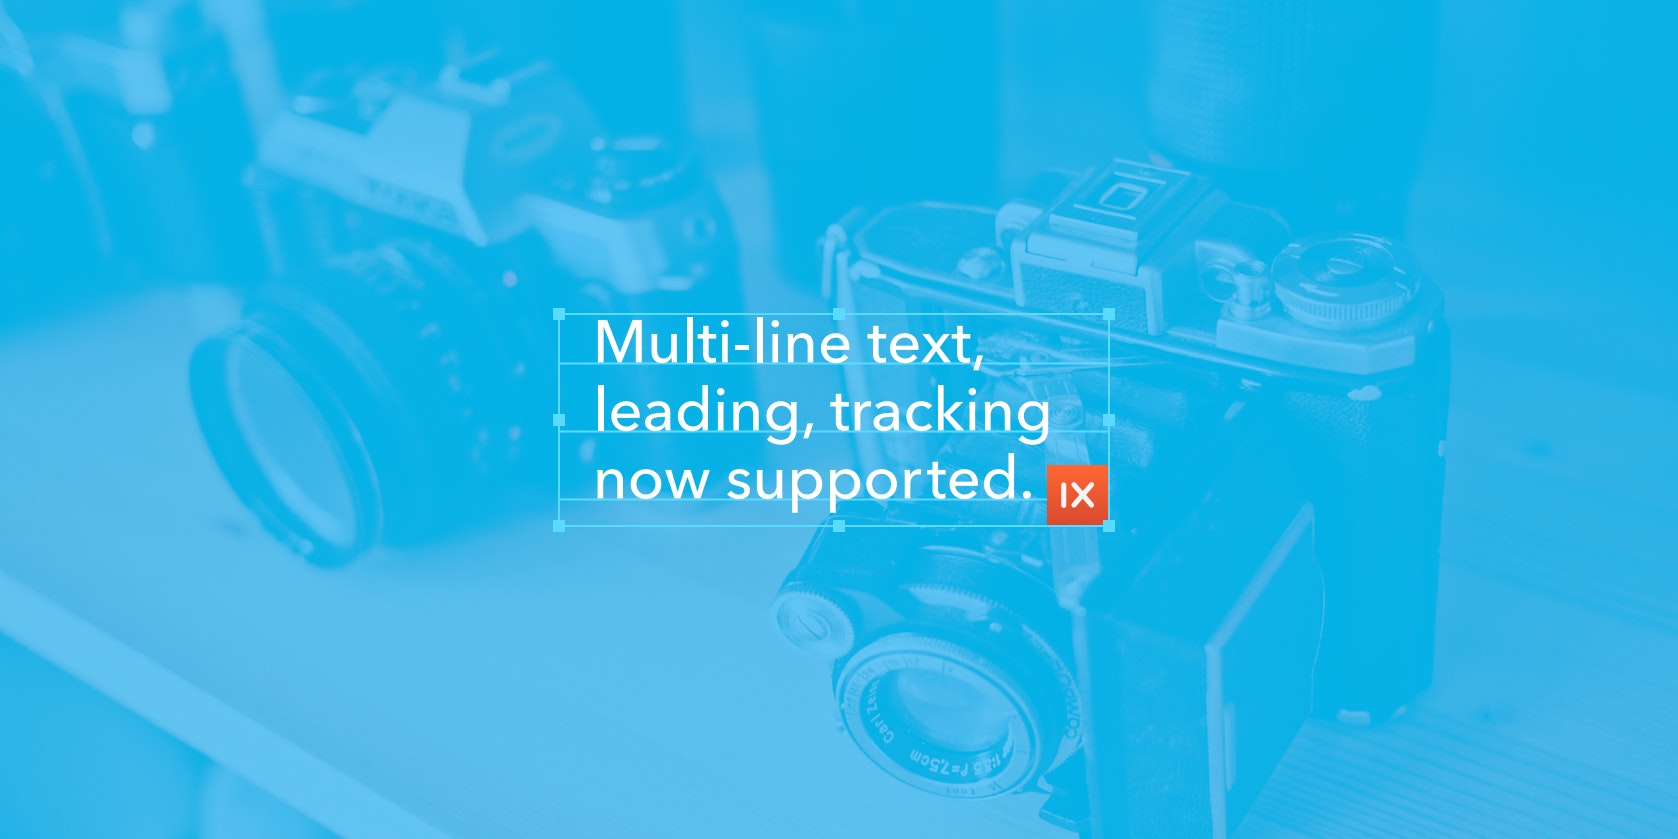
Multi-line Text & Overlays with the Typesetting Endpoint
Overlaying text on images is a design pattern with a long history, from protective watermarks to funny Internet memes. As social media and personalized user experiences become more important across all web platforms, dynamically combining words and imagery is a powerful but complex feature to implement, and crucial to many products.
Imgix has long offered a set of single-line text parameters to address this need. The Typesetting Endpoint (~text) provides additional controls that allow for multi-line text, leading, and letterspacing.
With controls for font size and face, color, padding, outlining, alignment, and cropping/clipping, the txt parameters make adding a line of text to an image incredibly easy. They have limitations, however, since they don’t include x/y positioning, multiple lines of text, or the ability to add a background color to improve contrast.
The Typesetting Endpoint combines all of our existing text capabilities with advanced typographic controls like leading, character tracking, multiple lines, and background colors. More importantly, it enables you to create images from the endpoint directly, without requiring a base image for the text to be overlaid on.
Note that images created with the ~text endpoint will be counted as new Origin Images.

New images created by the Typesetting Endpoint are treated like any other image and can accept a number of Imgix operations. For even more powerful applications, you can use them to create precise, complex layouts in real time via our blend and mark parameters.

The Typesetting Endpoint can be used as a composition and layout engine for any product or feature that requires text and images together, with no requirement that the text overlay be pre-generated. See the Practical Applications section below for examples of new user experiences that could be built on top of this feature.
Note: The Typesetting Endpoint prefers Base64 encoding and should be used with the Base64 versions of the relevant parameters. See the Base64 blog post for more detail.
Basic Typesetting #basic
The Typesetting Endpoint (~text) augments Imgix’s existing text parameters by adding the controls needed for full typographic control. First and foremost, it enables multi-line text layouts with automatic word wrapping to the width you specify. The height is flexible and the image will expand to fit the text, if no height is specified.
dpr=2&fm=png&txt-size=28&w=320&txt-font64=SGVsdmV0aWNhIE5ldWUgTGlnaHQ&txt64=RmFyIGZhciBhd2F5LCBiZWhpbmQgdGhl&txt-pad=0&txt-color=212B32
dpr=2&fm=png&txt-size=28&w=320&txt-font64=SGVsdmV0aWNhIE5ldWUgTGlnaHQ&txt64=RmFyIGZhciBhd2F5LCBiZWhpbmQgdGhlIHdvcmQgbW91bnRhaW5zLCBmYXIgZnJvbSB0aGUgY291bnRyaWVzLCB0aGVyZSBsaXZlIHRoZSBibGluZA&txt-pad=0&txt-color=212B32
The Typesetting Endpoint also allows you to set leading (txt-lead) and tracking (txt-track) for fine-tuning both line and character spacing. Combined with the existing txt-font, txt-color, txt-pad, txt-align, and bg parameters, you can easily create popular features such as quote overlays. The generated image will expand to fit the text, width, and font size you define. The default width is 200, and the height can be constrained with the w parameter.
Tracking | txt-track
Tracking gives you the ability to alter the spacing between all characters.
w=640&h=230&txt-size=48&txt64=VGhlIHF1aWNrIGZveCBqdW1wcyBvdmVyIHRoZSBsYXp5IGRvZy4&txt-color=212B32&txt-pad=32&txt-font64=SGVsdmV0aWNhIE5ldWUgTGlnaHQ&txt-track=-2
w=640&h=230&txt-size=48&txt64=VGhlIHF1aWNrIGZveCBqdW1wcyBvdmVyIHRoZSBsYXp5IGRvZy4&txt-color=212B32&txt-pad=32&txt-font64=SGVsdmV0aWNhIE5ldWUgTGlnaHQ&txt-track=20
Leading | txt-lead
Leading controls the amount of space between lines of text.
w=640&h=230&txt-size=48&txt64=VGhlIHF1aWNrIGZveCBqdW1wcyBvdmVyIHRoZSBsYXp5IGRvZy4&txt-color=212B32&txt-pad=32&txt-font64=SGVsdmV0aWNhIE5ldWUgTGlnaHQ&txt-lead=0
w=640&h=230&txt-size=48&txt64=VGhlIHF1aWNrIGZveCBqdW1wcyBvdmVyIHRoZSBsYXp5IGRvZy4&txt-color=212B32&txt-pad=32&txt-font64=SGVsdmV0aWNhIE5ldWUgTGlnaHQ&txt-lead=30
Background Color | bg
Set a background color to the text area.
w=640&h=230&txt-size=48&txt64=VGhlIHF1aWNrIGZveCBqdW1wcyBvdmVyIHRoZSBsYXp5IGRvZy4&txt-color=212B32&txt-pad=32&txt-font64=SGVsdmV0aWNhIE5ldWUgTGlnaHQ
w=640&h=230&txt-size=48&txt64=VGhlIHF1aWNrIGZveCBqdW1wcyBvdmVyIHRoZSBsYXp5IGRvZy4&txt-color=fff&txt-pad=32&txt-font64=SGVsdmV0aWNhIE5ldWUgTGlnaHQ&bg=07283A
Alignment | txt-align
Set the horizontal alignment of the text. Possible values are: left, center, or right.
w=640&h=230&txt-size=48&txt64=VGhlIHF1aWNrIGZveCBqdW1wcyBvdmVyIHRoZSBsYXp5IGRvZy4&txt-color=212B32&txt-pad=32&txt-font64=SGVsdmV0aWNhIE5ldWUgTGlnaHQ&txt-align=center
w=640&h=230&txt-size=48&txt64=VGhlIHF1aWNrIGZveCBqdW1wcyBvdmVyIHRoZSBsYXp5IGRvZy4&txt-color=212B32&txt-pad=32&txt-font64=SGVsdmV0aWNhIE5ldWUgTGlnaHQ&txt-align=right
To use the generated text with a base image, add the entire URL created by the Typesetting Endpoint and append it to the base image URL as the value for either mark or blend. The text image URL will need to be Base64-encoded first, and you will need to use the mark64 or blend64 variants of the parameters. For example, here is a simple 2-line caption that a photographer might use:
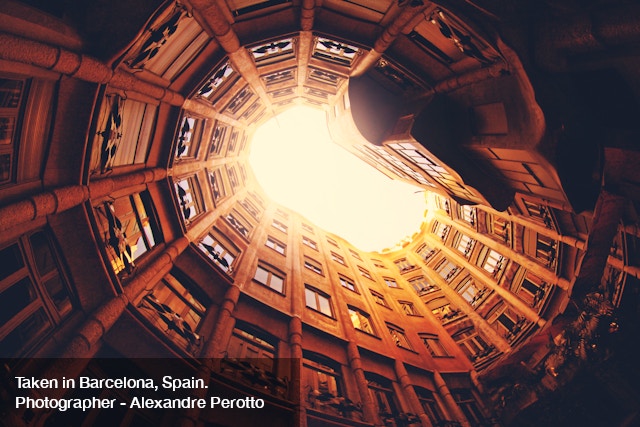
Here is the breakdown of the parameters applied to the image and the parameters applied to the text overlay, followed by the full URL for the image above.
Base Image
https://assets.imgix.net/unsplash/unsplash005.jpg
Image Parameters
w=600 q=90 mark-pad=0 mark-align=bottom,left mark64=*
Text Watermark Parameters
Entire string is Base64-encoded & passed to mark:
txt-size=16 w=300 bg=70000000 txt-color=fff txt-font=HelveticaNeue-Medium txt64=Taken in Barcelona, Spain. Photographer - Alexandre Perotto (this text string is also pre-encoded into Base64)
Final URL
https://assets.imgix.net/unsplash/unsplash005.jpg?q=90&mark-align=bottom,left&mark-pad=0&w=640&mark64=aHR0cDovL2Fzc2V0cy5pbWdpeC5uZXQvfnRleHQ_dHh0cGFkPTE1JnR4dHNpemU9MTYmdz0zMDAmYmc9NzAwMDAwMDAmdHh0Y29sb3I9ZmZmJnR4dGZvbnQ9SGVsdmV0aWNhTmV1ZS1NZWRpdW0mdHh0NjQ9VkdGclpXNGdhVzRnUW1GeVkyVnNiMjVoTENCVGNHRnBiaTRnVUdodmRHOW5jbUZ3YUdWeUlDMGdRV3hsZUdGdVpISmxJRkJsY205MGRHOA
Compositing with Blends and Watermarks #composite
In addition to basic text overlays and layout, the Typesetting Endpoint (in combination with mark and blend), makes more complex compositing possible, with precise positioning of text blocks and the ability to have multiple text overlays on a single base image. As in the above example, all txt, mark, and blend values are pre-encoded into Base64 to enable nesting.


Base Image
https://assets.imgix.net/unsplash/nightsky.jpg
Text Endpoint Set as Blend
blend64=
https://assets.imgix.net/~text?txt64=Far far away, txt-color=fff txt-font=avenir-black txt-size=48 w=600 txt-pad=20
Text Endpoint Set as Watermark
mark64=
https://assets.imgix.net/~text?txt64=behind the word mountains, far from the countries Vokalia and Consonantia, there live the blindtexts. Separated they live in Bookmarksgrove right at the coast of the Semantics, a large language ocean. txt-color=fff txt-font=avenir txt-size=18 txt-pad=20 w=520
Mark Positioning
mark-x=20 mark-y=150
Blend Mode & Positioning
blend-x=80 blend-y=20 blend-mode=normal
Set Image Width
w=640
Final URL
https://assets.imgix.net/unsplash/nightsky.jpg?w=640&mark64=aHR0cHM6Ly9hc3NldHMuaW1naXgubmV0L350ZXh0P3R4dDY0PVltVm9hVzVrSUhSb1pTQjNiM0prSUcxdmRXNTBZV2x1Y3l3Z1ptRnlJR1p5YjIwZ2RHaGxJR052ZFc1MGNtbGxjeUJXYjJ0aGJHbGhJR0Z1WkNCRGIyNXpiMjVoYm5ScFlTd2dkR2hsY21VZ2JHbDJaU0IwYUdVZ1lteHBibVFnZEdWNGRITXVJRk5sY0dGeVlYUmxaQ0IwYUdWNUlHeHBkbVVnYVc0Z1FtOXZhMjFoY210elozSnZkbVVnY21sbmFIUWdZWFFnZEdobElHTnZZWE4wSUc5bUlIUm9aU0JUWlcxaGJuUnBZM01zSUdFZ2JHRnlaMlVnYkdGdVozVmhaMlVnYjJObFlXNCZ0eHRjbHI9ZmZmJnR4dGZvbnQ9YXZlbmlyJnc9NTIwJnR4dHNpemU9MTgmdHh0cGFkPTIw&mark-y=150&mark-x=20&blend64=aHR0cHM6Ly9hc3NldHMuaW1naXgubmV0L350ZXh0P3R4dDY0PVJtRnlJR1poY2lCaGQyRjVMQSZ0eHRjbHI9ZmZmJnR4dGZvbnQ9YXZlbmlyLWJsYWNrJnR4dHNpemU9NDgmdz02MDAmdHh0cGFkPTIw&blend-mode=normal&blend-x=20&blend-y=80
Positioning Text Blocks #position
Both mark and blend offer both pixel-precise positioning and padding for text overlays. The mark-x/mark-y and blend-x/blend-y parameters will put the overlay at exactly the coordinates you specify, and are best used when the x and y aren’t the same, or when you want to have the overlay right up against an edge of the image. Setting them to 0 will override the default padding value of 10 to make them flush with the edge.
Similarly, the mark-pad and blend-pad parameters allow you to add padding around the overlay to push it away from the edge of the base image. They are applied relative to the alignment of the image, so if mark-align=bottom and mark-pad=20, the overlay will be 20 pixels from the bottom.
mark-align=top,left&mark-pad=0&mark64=aHR0cDovL2Fzc2V0cy5pbWdpeC5uZXQvfnRleHQ_dHh0NjQ9UVNCemJXRnNiQ0J5YVhabGNpQnVZVzFsWkNCRWRXUmxiaUJtYkc5M2N5QmllU0IwYUdWcGNpQndiR0ZqWlNCaGJtUWdjM1Z3Y0d4cFpYTWdhWFFnZDJsMGFDQjBhR1VnYm1WalpYTnpZWEo1SUhKbFoyVnNhV0ZzYVdFdUlFbDBJR2x6SUdFZ2NHRnlZV1JwYzJWdFlYUnBZeUJqYjNWdWRISjVMQ0JwYmlCM2FHbGphQ0J5YjJGemRHVmtJSEJoY25SeklHOW1JSE5sYm5SbGJtTmxjeUJtYkhrZ2FXNTBieUI1YjNWeUlHMXZkWFJvTGcmdHh0Y2xyPWZmZiZ0eHRzaXplPTI0Jnc9NDAw&w=640
w=640&mark64=aHR0cDovL2Fzc2V0cy5pbWdpeC5uZXQvfnRleHQ_dHh0NjQ9UVNCemJXRnNiQ0J5YVhabGNpQnVZVzFsWkNCRWRXUmxiaUJtYkc5M2N5QmllU0IwYUdWcGNpQndiR0ZqWlNCaGJtUWdjM1Z3Y0d4cFpYTWdhWFFnZDJsMGFDQjBhR1VnYm1WalpYTnpZWEo1SUhKbFoyVnNhV0ZzYVdFdUlFbDBJR2x6SUdFZ2NHRnlZV1JwYzJWdFlYUnBZeUJqYjNWdWRISjVMQ0JwYmlCM2FHbGphQ0J5YjJGemRHVmtJSEJoY25SeklHOW1JSE5sYm5SbGJtTmxjeUJtYkhrZ2FXNTBieUI1YjNWeUlHMXZkWFJvTGcmdHh0Y2xyPWZmZiZ0eHRzaXplPTI0Jnc9NDAw&mark-pad=0&mark-align=center,middle
w=640&mark64=aHR0cDovL2Fzc2V0cy5pbWdpeC5uZXQvfnRleHQ_dHh0NjQ9UVNCemJXRnNiQ0J5YVhabGNpQnVZVzFsWkNCRWRXUmxiaUJtYkc5M2N5QmllU0IwYUdWcGNpQndiR0ZqWlNCaGJtUWdjM1Z3Y0d4cFpYTWdhWFFnZDJsMGFDQjBhR1VnYm1WalpYTnpZWEo1SUhKbFoyVnNhV0ZzYVdFdUlFbDBJR2x6SUdFZ2NHRnlZV1JwYzJWdFlYUnBZeUJqYjNWdWRISjVMQ0JwYmlCM2FHbGphQ0J5YjJGemRHVmtJSEJoY25SeklHOW1JSE5sYm5SbGJtTmxjeUJtYkhrZ2FXNTBieUI1YjNWeUlHMXZkWFJvTGcmdHh0Y2xyPWZmZiZ0eHRzaXplPTI0Jnc9NDAw&mark-pad=0&mark-align=bottom,right
w=640&mark64=aHR0cDovL2Fzc2V0cy5pbWdpeC5uZXQvfnRleHQ_dHh0NjQ9UVNCemJXRnNiQ0J5YVhabGNpQnVZVzFsWkNCRWRXUmxiaUJtYkc5M2N5QmllU0IwYUdWcGNpQndiR0ZqWlNCaGJtUWdjM1Z3Y0d4cFpYTWdhWFFnZDJsMGFDQjBhR1VnYm1WalpYTnpZWEo1SUhKbFoyVnNhV0ZzYVdFdUlFbDBJR2x6SUdFZ2NHRnlZV1JwYzJWdFlYUnBZeUJqYjNWdWRISjVMQ0JwYmlCM2FHbGphQ0J5YjJGemRHVmtJSEJoY25SeklHOW1JSE5sYm5SbGJtTmxjeUJtYkhrZ2FXNTBieUI1YjNWeUlHMXZkWFJvTGcmdHh0Y2xyPWZmZiZ0eHRzaXplPTI0Jnc9NDAw&mark-pad=40
Click an image to see it in the Sandbox.
Colored and Translucent Backgrounds and Text
Another advantage of the Typesetting Endpoint is the ability to put backgrounds behind the text and control the background’s opacity. Adding a background is easily done by applying the bg parameter as in the photographer’s watermark example above. That example uses a transparent black 6-value hexadecimal color (80000000), but it can also accept 3- and 6-value colors if you prefer it to be solid (the first two numbers in the 8-value color represent the percentage of opacity—80000000 would be black at 80%).
Translucency can also be applied to the text itself, using the blend parameters. By setting blend-mode=normal and blend-alpha to an opacity percentage, whatever text you specify as the value of the blend parameter will have those values. The opacity will be applied to whatever txt-color value you set for the overlay (default is 000). This can also be achieved with mark and the mark-alpha parameter.
mark-pad=0&w=600&mark64=aHR0cHM6Ly9hc3NldHMuaW1naXgubmV0L350ZXh0P3R4dDY0PVNYUWdhWE1nWVNCd1lYSmhaR2x6WlcxaGRHbGpJR052ZFc1MGNua3NJR2x1SUhkb2FXTm9JSEp2WVhOMFpXUWdjR0Z5ZEhNZ2IyWWdjMlZ1ZEdWdVkyVnpJR1pzZVNCcGJuUnZJSGx2ZFhJZ2JXOTFkR2d1JmJnPWFhMTcxRTIzJnR4dGNscj1mZmYmdHh0c2l6ZT0yOCZ3PTUwMCZ0eHRwYWQ9MjA&mark-align=center,bottom
mark-align=center,bottom&mark64=aHR0cHM6Ly9hc3NldHMuaW1naXgubmV0L350ZXh0P3R4dDY0PVNYUWdhWE1nWVNCd1lYSmhaR2x6WlcxaGRHbGpJR052ZFc1MGNua3NJR2x1SUhkb2FXTm9JSEp2WVhOMFpXUWdjR0Z5ZEhNZ2IyWWdjMlZ1ZEdWdVkyVnpJR1pzZVNCcGJuUnZJSGx2ZFhJZ2JXOTFkR2d1JmJnPWFhMTcxRTIzJnR4dGNscj1mZmYmdHh0c2l6ZT0yOCZ3PTUwMCZ0eHRwYWQ9MjA&w=600&mark-pad=0&mark-alpha=25
Click an image to see it in the Sandbox.
Practical Applications
There are a lot of ways to powerfully combine text and images to create richer visual experiences and creative tools, in addition to the straightforward use of overlays. In particular, being able to programmatically pipe text into the Typesetting Endpoint allows for more dynamic personalization and control over output images intended for sharing on social media. Consider the following common use cases:
Placeholder Images
Generate an image of a specified size by piping in the width and height to both the w and w parameters and the Typesetting Endpoint, with no image required and minimal CSS. https://placem.at/ is a placeholder service that uses it along with public domain images, and you can see a very simple implementation by clicking the button below.
Personalization/Attribution
Add user data programmatically to any image to create better user experiences.
- Watermark user-generated content to protect your users’ contributions
- Create personalized images for promotions based on user profiles/preferences (great for applications where CSS is problematic, like email)
User-Generated Content
Create a tool that allows users to easily make shareable quotes by choosing an image, entering text, and applying overlay effects like the ones listed in the Best Practices section below.
Ads/Social Media
Add dynamically-generated text like hashtags, pull quotes, captions, or URLs to content that you share on social media, without opening Photoshop.
Best Practices for Type on Images
Making type look good over images can be a challenge, depending on the color range and visual complexity of the base image. Here are some tips and examples that will help guide your design decisions when using the Typesetting Endpoint for overlays.
mark-pad=0&w=600&h=300&fit=crop&mark64=aHR0cHM6Ly9hc3NldHMuaW1naXgubmV0L350ZXh0P3R4dDY0PVJWWkZUaUJVU0VVZ1FVeE1MVkJQVjBWU1JsVk1JRkJQU1U1VVNVNUhJRWhCVXlCT1R5QkRUMDVVVWs5TUlFRkNUMVZVSUZSSVJTQkNURWxPUkNCVVJWaFVVdyZ0eHRjbHI9ZmZmJnR4dHNpemU9Mjgmdz01MDAmdHh0cGFkPTIwJnR4dGZvbnQ9YXZlbmlyLWJsYWNrJnR4dGFsaWduPWNlbnRlcg&mark-align=center,middle
mark-pad=0&w=600&h=300&fit=crop&mark64=aHR0cHM6Ly9hc3NldHMuaW1naXgubmV0L350ZXh0P3R4dDY0PVJWWkZUaUJVU0VVZ1FVeE1MVkJQVjBWU1JsVk1JRkJQU1U1VVNVNUhJRWhCVXlCT1R5QkRUMDVVVWs5TUlFRkNUMVZVSUZSSVJTQkNURWxPUkNCVVJWaFVVdyZiZz1kZDBBQUZFMiZ0eHRjbHI9ZmZmJnR4dHNpemU9Mjgmdz01MDAmdHh0cGFkPTIwJnR4dGZvbnQ9YXZlbmlyLWJsYWNrJnR4dGFsaWduPWNlbnRlcg&mark-align=center,middle
blend-mode=normal&blend=aaF5532A&mark-pad=0&w=600&h=300&fit=crop&mark64=aHR0cHM6Ly9hc3NldHMuaW1naXgubmV0L350ZXh0P3R4dDY0PVJWWkZUaUJVU0VVZ1FVeE1MVkJQVjBWU1JsVk1JRkJQU1U1VVNVNUhJRWhCVXlCT1R5QkRUMDVVVWs5TUlFRkNUMVZVSUZSSVJTQkNURWxPUkNCVVJWaFVVdyZ0eHRjbHI9ZmZmJnR4dHNpemU9Mjgmdz01MDAmdHh0cGFkPTIwJnR4dGZvbnQ9YXZlbmlyLWJsYWNrJnR4dGFsaWduPWNlbnRlcg&mark-align=center,middle
blur=200&mark-pad=0&w=600&h=300&fit=crop&mark64=aHR0cHM6Ly9hc3NldHMuaW1naXgubmV0L350ZXh0P3R4dDY0PVJWWkZUaUJVU0VVZ1FVeE1MVkJQVjBWU1JsVk1JRkJQU1U1VVNVNUhJRWhCVXlCT1R5QkRUMDVVVWs5TUlFRkNUMVZVSUZSSVJTQkNURWxPUkNCVVJWaFVVdyZ0eHRjbHI9ZmZmJnR4dHNpemU9Mjgmdz01MDAmdHh0cGFkPTIwJnR4dGZvbnQ9YXZlbmlyLWJsYWNrJnR4dGFsaWduPWNlbnRlcg&mark-align=center,middle
Click an image to see it in the Sandbox
Keep the Base Image Simple
The easiest way to ensure that the text is readable is to choose a base image that isn’t busy, or has a large enough area of solid color to contrast with the text. This works better for one-off situations than larger numbers of images, however, since the location of the text would need to change from image to image.
Add a Background Color
If the base image is particularly busy, you can create a calm area behind the text by adding a background and padding to your text. For a basic background, try bg=000&mark-pad=20. You can adjust the color to match the image as desired.
Put a Transparent Color Over the Entire Image
This method obscures the photo a bit, but can help the text pop more if the image detail isn’t as important. You can use the blend parameter to apply an overlay of any color by supplying the hex value of the color as the value. blend supports transparency either by using an 8-color hexadecimal value, or by using the blend-alpha parameter in addition to blend.
Blur the Base Image
Another way to reduce the visual noise is to blur the base image to reduce the amount of detail. You can use the blur parameter to do this easily; try setting blur=100 as a starting point and adjust from there.
How to Experiment Further
The Typesetting Endpoint is a powerful tool, and the techniques listed here are great places to start when trying it out and considering what you might want to build. However, they are just the beginning of what can be done. We encourage you to experiment with it—the links to the Sandbox from this post, the sample code below, and the documentation examples are great ways to try out different options and combinations of effects.