Asset Manager
Accessing Asset Manager
Navigate to Asset Manager by clicking the Assets link in the top navigation bar of the Dashboard.
Browse
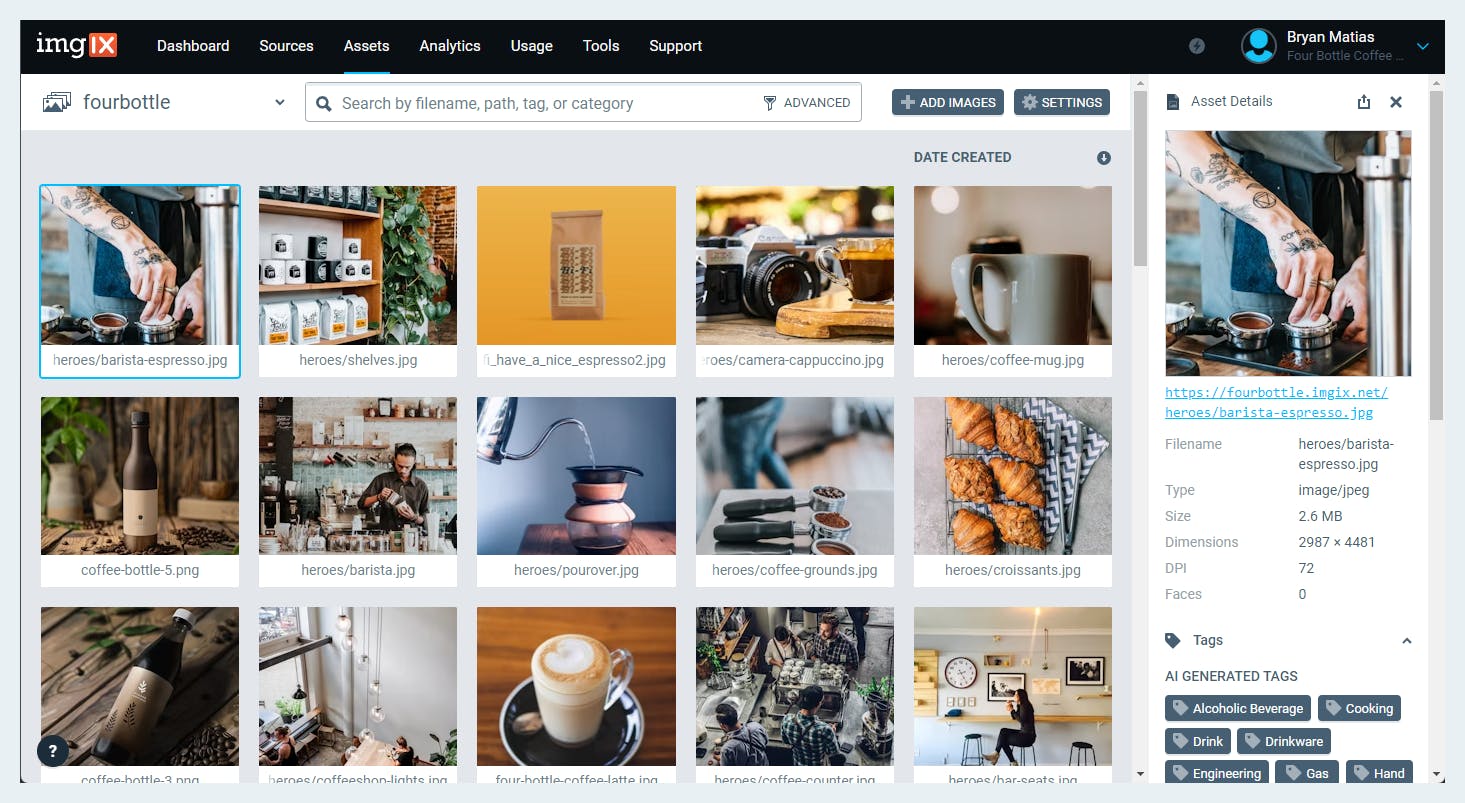
The Asset Manager homepage will show the List View, which you can use to browse all of your assets in a particular Source. You can switch between Sources by selecting from the Source dropdown in the upper left corner (you will not see a dropdown option if your Asset Manager setup has only one Source with assets).
By default, assets are sorted by Date Created, with the most recent assets first. The other supported sorts are Date Updated and File Size. All sorts can be either ascending or descending.
Image Details
Clicking on an image thumbnail in the List View will load that image’s details in the Info Panel on the right.
The Info Panel displays metadata, AI-powered tags, user-defined categories, user-defined custom fields, content alerts, and color data. Each section can be toggled open or closed and Asset Manager will remember the closed/open state per device/browser.
Note: Asset Manager has a 500MB limit for each image.
Metadata
This section displays image metadata, including:
- Filename
- Clickable imgix URL (e.g. https://assets.imgix.net/examples/bridge.jpg)
- Content Type
- File Size
- Dimensions
- DPI
- Faces (if face detection is enabled for your account)
Asset Tags
Asset tags are generated by AI-powered analysis. Tags are used to describe the content or subject matter of the image. Tags are displayed in order of their confidence score, which you can see if you hover over a specific tag.
Clicking on a tag will execute a search for other images in that Source with the same tag.
If you would like to remove a tag from an image, click the “Edit” button, click the “×” next to any tag that should be removed, then click the “Save” button. Removed tags will still appear but will be greyed out and the confidence level will be set to 0%.
Asset tag generation is a Premium feature and is not available for all accounts. Contact us if you would like to enable this premium feature for your account.
Categories
Categories are defined by users and can be used to organize your assets. To add a category, click the “Add” button and then either choose an existing category or click “Add new category” and type a new category. Clicking on a category will execute a search for other images in that Source with the same category.
Categories can be removed or edited via Asset Manager Settings.
Custom Fields
Custom fields are key-value pairs defined by users that can be used to associate information with your images. A common use case is to add a user or product ID, where the key might be “User ID” and the value would be “123”. To add a custom field, click “Add”, then either select from available keys or select “Add New Key”. Enter your key and value, then click “Save”.
Custom field keys can be removed or edited via Asset Manager Settings.
Content Alerts
Content alerts are generated by AI-powered image analysis and cover five categories: Adult, Violent, Medical, Racy, and Spoof. Each image will receive a score in each of the five categories, listed here from low to high probability: Doubtful, Unlikely, Possible, Likely, Probable. If the image scores Likely or higher in either the Adult or Violent categories, the icon in the content alerts header will change to reflect the severity of the content alert. (The image highlighted in the screenshot below is not actually classified as Possible Adult; it is only used as an illustration.)
Content alerts are a Premium feature and are not available for all accounts. Contact us if you would like to enable this premium feature for your account.
Color Data
The color data section will show the color profile, color model, and the image’s dominant colors. Clicking on a color will execute a search for other images that contain that color.
Color extraction is a Premium feature and is not available for all accounts. Contact us if you would like to enable this premium feature for your account.
Image Detail View
The image detail view shows an image at a larger size and at its original aspect ratio. Open the image detail view either by clicking on an already-selected image thumbnail in the list view or by double-clicking on an image thumbnail in the list view. Exit the image detail view by clicking the “x” in the upper left corner or by pressing Esc
on your keyboard.
The image detail view also has an option in the upper right corner to show or hide the image. Hiding an image will pixelate the image so that the original content is no longer discernible, and showing an image will restore the original image. Showing or hiding an image only has an effect within Asset Manager; it does not impact the actual rendering of the image outside of Asset Manager. Once an image is shown or hidden, it will remain that way inside Asset Manager, though that state will not be saved across browsers/devices or across users.
By default, any image that scores “Likely” or higher in the Adult or Violent category will be shown as hidden.
Searching
Keyword Search
Typing in the search box near the top of the screen will execute a keyword search. This will search across multiple pre-determined fields, such as the image origin path, the name, description, tag, category, custom field, etc. Exact behavior is subject to change.
Tag Search
Searching can be performed by tag. Navigate to an image and click on one of its tags to execute a search for other images with the same tag.
Category Search
Searching can be performed by category. Navigate to an image and click on one of its categories to execute a search for other images with the same category.
Color Search
Searching can be performed by color. Navigate to an image and click on one of its color swatches to execute a search for other images with a similar color.
Advanced Search
To perform more complex searches, click on “Advanced” in the right side of the search bar. Use Advanced Filters to search based on tags, categories, custom fields, colors, folder path, content alerts, faces, animations, file types, and whether the image has been edited by a user. Selecting multiple filters will execute a search for images that meet the criteria of all of the filters.
Asset Manager Settings
The Asset Manager Settings page allows users to edit their created categories and custom fields keys. Access this page by clicking on the link in the Account Settings page or by clicking on the gear icon in the upper right corner of the Asset Manager.
Editing a category or a custom field key will automatically update that category or custom field key for every image that is associated with that metadata. Deleting a category or custom field key will remove that metadata from every image with which it is currently associated. Note: Deleting a category or a custom field key is not reversible, so proceed with caution.
Refreshing an asset
If you have made changes to an image at your origin and would like to see those changes reflected in Asset Manager, you can refresh the asset. To refresh an asset, navigate to the image in Asset Manager and click the “Refresh” button in the upper right corner of the Info Panel. This will re-fetch the image.
Refreshing will also reprocess the image for content alerts and any AI-generated information such as smart tagging and alt-text.
Uploading
Asset Manager allows you to upload directly to your cloud storage–backed Source. Uploading to Web Folder or Web Proxy Sources is not supported.
Depending on your storage type, uploading has different limitations and requirements. See the table below:
Source Type | Upload Support | File Size Limit | Requires CORS Configuration |
---|---|---|---|
Amazon S3 | YES | 5GB | YES |
Google Cloud Storage | YES | 5GB | YES |
Microsoft Azure | YES | 30MB | NO |
DigitalOcean | YES | 5GB | YES |
Cloudflare R2 | YES | 4.99GB | YES |
Wasabi | YES | 5GB | NO |
Linode | YES | 5GB | NO |
Web Folder | NO | N/A | N/A |
Web Proxy | NO | N/A | N/A |
Before you begin uploading assets to a Source, you must complete the Upload Setup for each Source you wish to upload to.
Why Is Uploading Setup Required?
When you set up your Source for rendering, imgix only requires read and list permissions—the minimum permissions required to render images. Write permissions are required for uploading, and we recommend using separate credentials to ensure your rendering is not impacted.
Upload Setup
If your Source has not yet been configured for uploading, click the “Upload” button in the upper right corner of Asset Manager to begin the setup process. Alternatively, dragging and dropping files into the List View will bring you to the Upload Setup view.
We highly recommend generating new credentials just for use by imgix and that these upload_credentials
be separate from your deployment_credentials
.
Amazon S3
Add your S3 upload_credentials
The “Amazon S3 Full Access” policy template for your IAM account is the easiest way to create new S3 credentials for uploading.
- Go to your AWS IAM Dashboard.
- Click Users on the left navigation.
- Click Add User or select an existing user.
- If adding a User, give them a User Name.
- Click the
Next
button to be brought to Step #2, Set Permissions. - Select the Attach existing policies directly option.
- You will be presented with a list of policy templates. Search “AmazonS3FullAccess”, and check its option checkbox. If you prefer to set your own specific permission policy, see the note below.
- Click
Next
to review your new user. - If everything looks correct, select the
Create user
button. - Once you’ve created your new user, visit its details page and create a set of access keys under the security credentials tab. These keys will act as your
upload_credentials
, allowing you to upload images and videos directly to your Source.
Or, if you prefer to set specific permissions, grant the following:
ListBucket
GetBucketLocation
GetObject
PutObject
Update your bucket’s CORS configuration
Please update your CORS configuration allowing the PUT method and the Content-Type header from https://dashboard.imgix.com
. Your bucket’s CORS configuration can be found in the permissions tab of your bucket. See S3 documentation for more information.
- Navigate to your S3 Bucket in AWS
- Click on the Permissions tab
- Scroll down to Cross-origin resource sharing (CORS) section
- Add the
AllowedHeaders
,AllowedMethods
, andAllowedOrigins
properties. If your CORS section in your S3 settings is blank, you can copy the JSON values into your CORS configuration:
[
{
"AllowedHeaders": ["Content-Type"],
"AllowedMethods": ["PUT"],
"AllowedOrigins": ["https://dashboard.imgix.com"],
"ExposeHeaders": []
}
]
Google Cloud Storage
Add your GCS upload_credentials
If you’re using a GCS Source, you can add the Storage Object Admin
role from GCS’s role list. After you add the role to the user, you must generate the interoperability key by going to the Settings page in your console, then generating the key in the Interoperability tab.
Update your bucket’s CORS configuration
Please update your CORS configuration allowing the PUT method and the Content-Type header from https://dashboard.imgix.com
. For GCS you can do this programmatically or with their CLI tool. See GCS documentation for more information.
Example gsutil
CLI command to set CORS configuration:
gsutil cors set <CORS_JSON_FILE> gs://<BUCKET_NAME>
Example CORS JSON configuration file
[
{
"origin": ["https://dashboard.imgix.com"],
"method": ["PUT"],
"responseHeader": ["Content-Type"],
"maxAgeSeconds": 3600
}
]
Microsoft Azure
Add your Azure upload_credentials
For an Azure Source, you will need to generate a new shared access signature (SAS) token. To generate your SAS string, use the Shared Access Signature Settings
page for the storage account. Change the following settings:
- Allowed Services: Select
File
orBlob
, depending on the service type. - Allowed Resource Types: Select only
Container
andObject
. - Allowed Permissions: Select
Read
,List
, andWrite
. - Start and Expiry Date/Time: Change the end date to “2029-01-01” or choose a date at least one year in the future.
Finally, click Generate SAS and connection string. Below that is a text box labeled “SAS token”. The token begins with “?sv=”. The contents of this text box are your SAS token.
DigitalOcean
Add your DigitalOcean upload_credentials
Create a new set of Access and Secret Access Keys for your DigitalOcean bucket. These keys will act as your upload_credentials
, allowing you to upload images and videos directly to your Source.
Update your bucket’s CORS configuration
To upload assets directly using the imgix Asset Manager, you must allow the PUT method and the Content-Type
header from https://dashboard.imgix.com
in your Space’s CORS configuration.
Refer to the DigitalOcean documentation for instructions on how to configure CORS. Here is a screenshot example of how your configuration should look like.
Cloudflare R2
Add your Cloudflare R2 upload_credentials
Create a new set of Access and Secret Access Keys for your Cloudflare R2 bucket. When setting up your keys, be sure to grant Edit
permission. These keys will act as your upload_credentials
, allowing you to upload images and videos directly to your Source.
Update your bucket’s CORS credentials.
To upload assets directly using the imgix Asset Manager, you must allow the PUT method and the Content-Type
header from https://dashboard.imgix.com
in your R2 Object Storage’s CORS configuration.
Refer to the Cloudflare R2 documentation for instructions on how to configure CORS. Here is a screenshot example of how your configuration should look like.
Wasabi
Add your Wasabi upload_credentials
Create a new set of Access and Secret Access Keys for your Wasabi bucket. These keys will act as your upload_credentials
, allowing you to upload images and videos directly to your Source.
Linode
Add your Linode upload_credentials
Create a new set of Access and Secret Access Keys for your Linode bucket. When setting up your keys, be sure to grant Read/Write
permissions for the Linode Bucket your Source is set up with. These keys will act as your upload_credentials
, allowing you to upload images and videos directly to your Source.
Uploading Images
Once your upload setup is complete, you can begin uploading by clicking the Upload button in the upper right corner of Asset Manager or by dragging and dropping files into the List View.
Here you can specify an optional destination path for all of the images in the current upload. This is useful if you would like to upload your images into a specific subdirectory.
Note: Asset Manager will not overwrite anything already in your bucket. If you already have a file named bridge.jpg
in your bucket and you try to upload another file named bridge.jpg
to the same place in the bucket, the upload will fail.
After clicking “Upload” you will be taken to the Upload Manager view, which shows the progress of your uploads. Upon completion, click the “View” button to be taken back to Asset Manager to view your newly uploaded files.
Newly uploaded images are immediately available in Asset Manager and can be searched for and modified just like any other image.
The Asset Manager supports uploading any content-types.
Note: For assets larger than 50MB, we recommend using the upload session flow available for Amazon S3 and Google Cloud Storage sources.
Video Status
When video is enabled on a Source, compatible input formats will be automatically detected and transcoded. Video transcoding will end with one of the following statuses:
- Processing: The video is currently being processed by our service.
- Processed: The video has been successfully converted and can now be served through the
imgix.video
domain. It will remain until it is detected to have been deleted from the bucket. - Errored: There was an issue while processing the video. Issues might be due to one of the following:
- Incorrect input format: the video was detected in the bucket but is incompatible with the current supported formats.
- File too short: video files must be a minimum of 0.5 seconds in length.
- File inaccessible: issue accessing file in bucket.
If a video was processed and is deleted, it should disappear from your Asset Manager within 72 hours. If a deleted video persists for more than 72 hours, or if you have a video that is unexpectedly missing in the Asset Manager, please contact support with your video URL.
Asset Manager APIs
Nearly all of the functionality provided by Asset Manager in the Dashboard can also be accomplished via API. Read the documentation for the Asset Manager API to find out more.
Troubleshooting
405
CORS error when uploading
If you encounter a 405
error when uploading an image, it means that your CORS configuration is not correct. You can fix this issue by setting up CORS. Depending on your Source, you can find instructions on how to set up CORS here:
Assets take too long to show
The Asset Manager works best with S3, GCS and Azure Sources. If your Source is a Web Folder, assets take much longer to appear. If possible, we recommend switching over to a different Source to improve asset discovery times.
You can also use the Refresh API endpoint to immediately pull an asset into the Asset Manager.
Asset are not updating
Assets that have been deleted or updated at the Origin will take some time to be updated in the Asset Manager.
Use Refresh API endpoint if you need to immediately update an asset.